
Learning Objectives
You will learn how to create new staff members, edit staff member's profiles, assign pay rates, and deactivate staff members who are no longer with your your studio.
Adding a New Staff Member
- Go to the Home tab.
- Click on the Staff ribbon.
- Click Add Staff.

- Enter the staff member's First Name & Last Name.
- Entering Email address & Mobile Phone is optional, however it is highly encouraged.
- Adjust the staff member's gender as needed.
- Click Add.

Adding Staff Login and Contact Info
Once a staff members has been created in MINDBODY you will need to assign a staff login, assign a staff access permissions, and potentially assign a location.
- From the Staff page, locate the staff member you want to edit and click their name.

- Add the following to the staff member's page:
- Username: Use the staff member's first name and last name with no spaces or capitals, with a period between the first and last name (ie. stephanie.davis)
- Password: Create a password for the staff member and instrust them to update this as soon as they log in for the first time. All passwords must be at least 8 characters in length and contain 1 letter, 1 number, and 1 special character (ex. !, $, *).
- Permission Group: This setting is going to determine the level of access the staff member has within the software. Most staff will fall under the Staff setting, but Manager and Owner should be assigned as needed. All permission settings are preset based on iLKB's needs in advance.
- Login Locations: In some instances owners with multiple locations may have all their locations setup in 1 single MINDBODY site, called a Datashare. When this is the case the staff member will need to be assigned to the individual location(s) in which they work. This is important because staff not assigned to a location cannot complete transactions for that location.

- Update any necessary contact information such as email address or contact phone number. This information will be kept private and will not be available for customers to view, but is instead for internal reference.
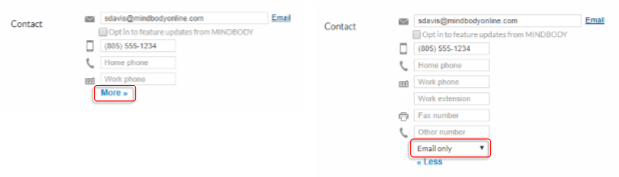
- Click More to reveal additional contact type options such as contact preferences.
- Once you have made all the necessary adjustments to the staff member's profile, click Save.

Assigning Staff Pay Rates
- Go to the Home tab.
- Click on the Staff ribbon.
- From the Staff page, locate the staff member who you want to assign pay rates for and click that staff member's name.
- Click Class/Hourly/Commission Pay Rates in the upper right corner of the staff profile.

- Locate the Default time clock rate under the Hourly pay rates section of the page and enter the staff member's hourly pay rate.
- Click Save.

Deactivating a Staff Member
Occasionally staff members will leave the studio. When this happens we need to make sure to deactivate their staff login to ensure they no longer have access to your studio's site.
- Go to the Home tab.
- Click on the Staff ribbon.
- From the Staff page, locate the staff member who you want to deactivate and click that staff member's name.
- Click Deactivate Staff Member on the lower left of the staff profile.

- Click Deactivate Staff & Delete Login.
